This toolbar contains the most frequently used functions. It is located below the ToolsTabs. From left to right this toolbar is organized in 3 groups of functions: •Catalogs •Working Mode •Position and Size •Block Tools •View Options •Layers Visualization
|
|
This is the MAIN toolbar
 |
Working Mode group
|
Working mode refers to the activity, which may include:
•CATALOGS |
|
Insert Designs, Memory Blocks, Motifs and Images to the current Design |
•CREATE OBJECT |
|
Activate the OBJECT CREATION MODE (Objects Creation) |
•EDIT OBJECT |
|
Activate the OBJECT EDITING MODE (Condensed Editing) |
•EDIT BEADS |
|
Activate the BLING BEADS EDITING MODE (Expanded Editing |
|
Note for users of previous versions: The Smart Design tool is now available as a panel you can open from the vertical tabs located at the right edge of the window |
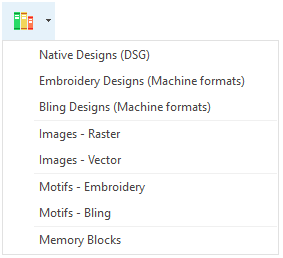
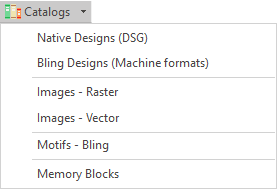
CATALOGS
|
This tool offers a catalog view of several resources for the creation of bling designs. Available tools depend on the software configuration. ➢Press on the arrow to unfold the list of tools |
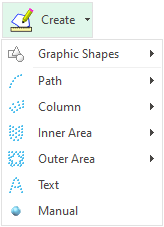
CREATE OBJECT
|
This function gathers the tools available to create a bling design. Available tools depend on the software configuration. ➢Press on the arrow to unfold the list of tools.
|
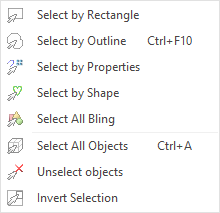
EDIT OBJECT
|
This tool allows you to select an object or block of objects for objects editing. After selection, you can modify the geometry (expand, reduce, rotate, mirror, etc.) from the workspace and edit the fill properties from the context tooltabs or from the Object Inspector. You can select any object type of any decoration specialty, including raster images, vector objects or bling objects. ➢Press on the arrow to unfold the list of tools. Note: Select by Properties and Select by Shapes commands are available as of version 23.10 |
EDIT BEADS (Expanded Editing)
|
This tool activates the bling beads editing mode. It allows to edit individual beads: move, delete, insert, etc. |
Size and Position group
|
This group includes controls to display and edit the position and size of the selected object or block. Any time you select an object or define a block, these controls are updated to reflect the proper values. You can change the reference point used to define the position of the object or block using the small button at the left. The up/down spin buttons allows small adjustments. You can also directly write a value into the controls and press enter. The padlock toggle allows to activate / deactivate proportional sizing. |
Block tools group
|
|
Note for users of previous versions: This group contains all the commands that in previous versions were shown within the Block Menu |
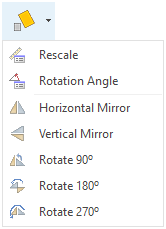
Scale / Mirror / Rotate
|
Includes commands to •Adjust the size of a block with precision by defining a reference segment and setting a new desired length for it. •Rotate a block to any angle •Mirroring a block either horizontally or vertically •Rotate a block by fixed values (90, 180 and 270 degrees) |
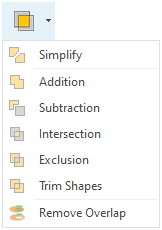
Combine Objects
|
This set of commands allows you to combine two or more objects: •Simplify: Remove overlapped shapes to simplify the drawing process •Addition:Transform selected shapes into a single shape •Subtraction: Remove the overlapped top shape from the bottom shape •Intersection: Create a new object from the intersection of the shapes, removing the rest of the shapes •Exclusion: Exclude the overlapped part of the top shape from the bottom shape •Trim Shapes: Create a new object from the intersection of the shapes, keeping the rest of the shapes •Remove Overlap: Eliminates overlapping regions while maintaining a small margin. |
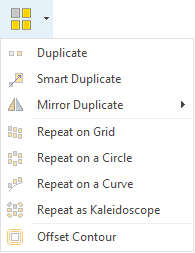
Repeat Objects
|
Contains commands to repeat the objects using different methods: •Duplicate: creates a copy of the object and position it at a fixed distance •Smart Duplicate: creates multiple copies of the object changing scale and rotation on the fly •Mirror Duplicate: creates a vertical/horizontal mirror copy of the selected object. •Repeat on Grid: creates multiple copies of the object placing them in rows and columns layout •Repeat on a Curve: creates multiple copies of a object placing the copies along a defined curve •Repeat as Kaleidoscope: creates copies of the object following a circular pattern while scaling and rotating the object •Offset Contour: creates copies of the object, outside or inside it, at configured distances from the |
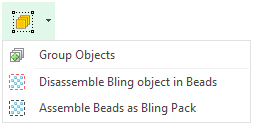
Group Objects
|
Commands to create and manipulate groups of objects •Group Objects: define a group including all the selected objects •Disassemble Bling object in Beads: removes the bling object but keeps the beads generated for the object, as individual beads •Assemble Beads as Bling Pack: removes the bling object but keeps the beads generated for the object, as a bling pack |
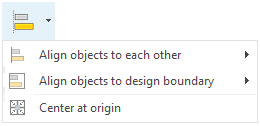
Align Objects
|
Commands to align objects among them or regarding the design boundary. •Align objects to each other: Top, Vertical middle, Bottom, Left, Horizontal middle, Right, Center •Align objects to design boundary: Top, Vertical Center, Bottom, Left, Horizontal Center, Right, Centered on design •Center at origin: all objects will be moved so as their centers will be at design origin (coordinate 0,0) |
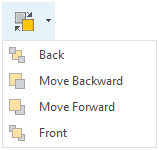
Change Order
|
Commands to modify the objects order within the design sequence. These commands do not modify the objects position (coordinates) •Back: the object will become the first object in the sequence, so it will be overlapped by any object located in the same place. •Move Backward: the object will move one position towards the top of the list. •Move Forward: the object will move one position towards the end of the list. •Front: the object will become the last object in the sequence, so it will overlap any object located in the same place.
|
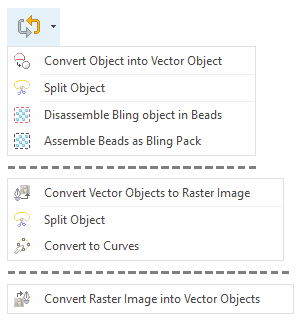
Convert Object
|
This menu contains several commands to convert object types. Different options are displayed depending on the selected object type. For bling objects •Convert Object into Vector Object •Split Object: Breaks an object in 2 parts using a curve that you define. •Disassemble Bling object in Beads: removes the bling object but keeps the beads generated for the object, as individual beads •Assemble Beads as Bling Pack: removes the bling object but keeps the beads generated for the object, as a bling pack For vector objects •Convert Vector Object to Raster Image •Split Object: Breaks an object in 2 parts using a curve that you define. •Convert to Curves: Converts Auto-Shape vector objects into the primitive curves For raster objects (pixel based images) •Convert Raster Image into Vector Objects: Creates vector objects by detecting the shapes in the raster images (Vectorizer tool) |
View Options group
|
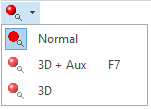
View Mode
|
It includes several graphic representation modes, such as: •Normal mode: Beads are drawn with simple lines (filled or not) •3D mode: Realistic 3D representation of the design •3D + Aux mode: Same as 3D mode, but it also shows the image used as reference for digitizing |
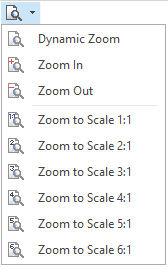
Zoom Functions
|
|
It includes most of the zoom modes, such as: •Dynamic Zoom •Zoom In •Zoom Out •Zooms to different Scales •etc. Details in Zoom Function |
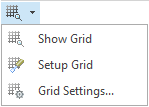
Grids
|
The Grid command controls the visibility of a set of small, equally spaced marks on the workspace. These marks allows you to accurately place objects within your design. You can control many aspects of the grid, such as the distance, mark shape, color, etc. Use the Grid button to turn on/off grid visibility. Details in Grid Function |
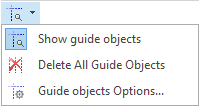
Guidelines
|
We call Guidelines to a set of auxiliary vertical and/or horizontal lines you can set to help with objects alignment and placement. Details in Guidelines Function |
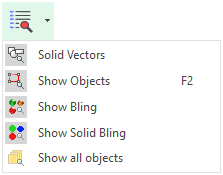
Show/Hide design references
|
We call references to the set of graphic elements that help you to understand the design on the workspace. You can show/hide (turn on/off) these elements.
|
Layers Visualization group
|
What does each layer indicator mean?
Each layer indicator refers to a specific group of objects included in a design that belong to a particular decoration specialty:
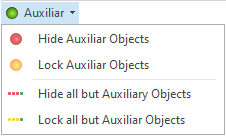
•Auxiliar |
Auxiliary objects are raster images, vector images and vector elements (graphics) which are used as background or as references to create the designs objects over it, but they are not part of the final design. |
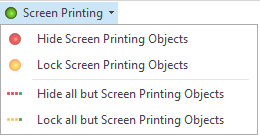
•Printing |
Printing objects are raster images, vector images and vector elements (graphics) that will be used for screen-printing or digital printing (they are part of the final design). |
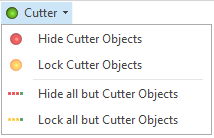
•Cutting |
Cutting objects are vector elements (graphics) that will be used for cutting on vinyl and laser cutters (they are part of the final design). |
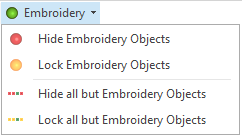
•Bling |
It includes all bling objects of any type. |
Show/Hide a decoration layer
By pressing the indicator you can show (or hide) the layer on the Workspace.
•Green indicator |
The objects of the selected decoration specialty are displayed in the workspace. |
•Red indicator |
The objects of the selected decoration specialty are not displayed in the workspace. |
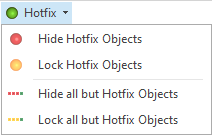
More decoration layer functions
|
By pressing on the drop-down arrow to access the other available options: Hide... Hides all the objects of the selected layer (decoration specialty). Lock... This function blocks all the objects of the selected layer (Yellow indicator). The objects can be visible but the application won't allow you to select and edit any object of the selected decoration specialty. This feature is very useful when you are digitizing and do not want to move any object of this decoration type by mistake while you create or edit objects of other decoration specialties. Just press this function again to unlock these objects. Hide all but... This function makes exactly the opposite to the "Hide" function: it hides all the other layers (decoration specialties) keeping the selected layer as the only visible layer. Lock all but... This function makes exactly the opposite to the "Lock" function: it blocks all the other layers (decoration specialties) keeping the selected layer as the only unblocked layer.
Notes: •When the on-screen simulation (3D) is enabled, the auxiliary objects will become hidden as they are not part of the final design. •The changes on the status of these indicators will be also reflected on the Document Map. Blocked objects will appear grayed out. Hidden objects will not appear on the respective tab. |